
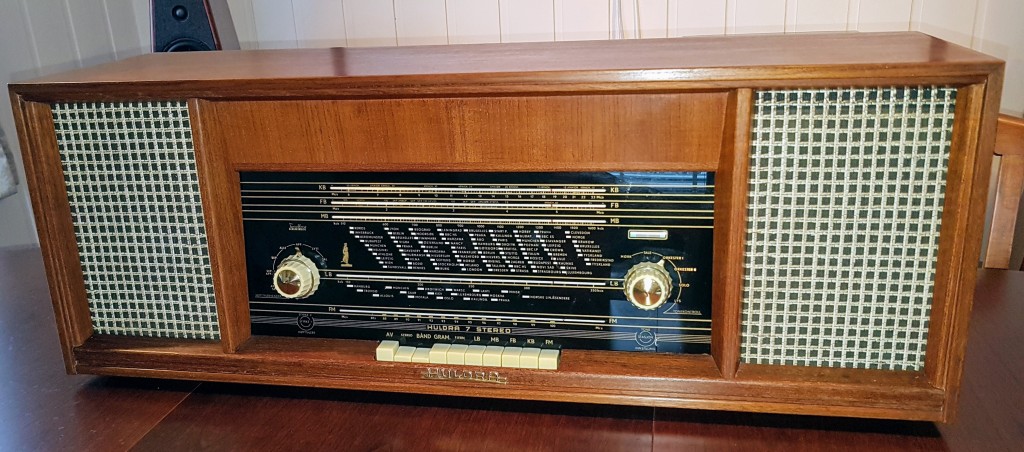
One of my first restorations when starting to collect broadcast receivers a few years ago, was this tube radio from between 1963 and -65, AM- and FM reception, stereo amplifier and integrated loudspeakers. It had been used in a craftsman’s workshop for decades, and was very dirty and dusty, but in pretty good shape after all.

Wall-to-wall carpeting gives a warm and cozy atmosphere, but it’s not trendy these days, so I decided to remove it 😀

After a good cleaning, the radio was mode pleasant to work with.

With some prior knowledge of electronics, but no experience with vacuum tubes, I got some new challenges and fascinations. To avoid potential disasters, I powered the radio through a dim bulb tester. At first startup, I was happy to find that the ECC83/EL84 amplifier didn’t sound too bad when fed with an external audio signal, but only for a couple of minutes, until it sounded more and more distorted. When measuring voltage levels, I found a significant and slowly increasing voltage on G1 of the output pentodes, which would most likely be caused by DC leakage in the Rifa coupling capacitors.

Replacing these solved the audio problem. Likewise for the radio part, I found most of the Hunt’s paper/oil caps to be leaky, and some of them even crumbled to pieces when desoldering them, so they had to be replaced with modern film caps. With only a schematic to look at (no service manual), and no decent function generator at that time, I didn’t align the receiver, but the radio reception was actually decent. With some more knowledge, I may want to re-visit the radio circuitry, to see if I can make it better.

On the dial scale glass, some of the print was flaking off. I restored these areas using dry transfers, originally intended for manual PCB production, plus some gold metallic paint, and the result turned out quite well.


The teak cabinet was treated with several rounds of Liberon furniture cleaner, finishing oil and beeswax.

Huldra 7 in use, with Chromecast audio connected to the Tape input. It doesn’t sound too bad, but the internal full-range speakers are a limiting factor. When connecting this single ended EL84 amp to the right speakers, however, it sounds awesome.
Later, I restored another Huldra 7, without internal speakers. Here it is connected to a pair of Tandberg HiFi System 7 speakers, a 2-way system in 25 liter cabinets and a sensitivity of 96dB/1W/1m, a good match for this radio/amplifier.

A short video clip for demonstration: A cellphone video only gives a slight hint of the actual sound, but in reality it’s so smooth and jazzy, I decided to build an amplifier on this basis later.

Leave a comment